Upload a File to Contacts
What file formats can I upload to Text-Em-All contacts?
Text-Em-All accepts contact files in .csv, .xlsx, or .xls formats with up to 1000 columns. Each contact can include first name, last name, up to 3 phone numbers, and notes. The platform automatically detects and maps your column information during the upload process.
All uploaded files must contain at least one valid 10-digit phone number per contact to import successfully.
File upload requirements
Before uploading, ensure your file meets these requirements:
- File format must be .csv, .xlsx, or .xls
- Contains fewer than 1000 columns
- Includes at least one 10-digit phone number per contact
- Phone numbers can be formatted as XXX-XXX-XXXX, XXX.XXX.XXXX, XXXXXXXXXX, or (XXX) XXX-XXXX
- File must not be open in another program during upload
How do I upload a contact file?
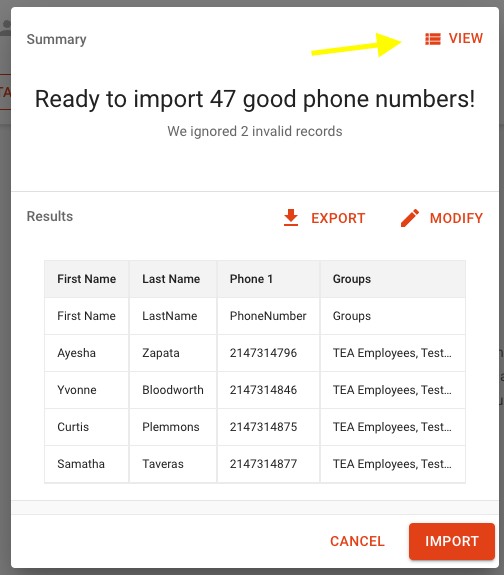
The upload process automatically detects your column information and provides a preview before importing. You can modify column assignments if the automatic detection needs adjustment.
- Navigate to your Contacts page
- Click the Upload a File button
- Drag and drop your file into the dialog or click Choose a File to browse
- Review the preview of detected information. If anything looks incorrect, click Modify to adjust column assignments
- Click Import to add the contacts to your account

How do I upload contacts to multiple groups at once?
You can assign contacts to multiple groups during upload by including a "Groups" column in your file. This feature requires specific setup and must be done from the Everyone folder.
Before you begin
- Create your groups first — All groups must already exist in your account before uploading
- Use exact group names — Group names in your file must match your account exactly
- Format the Groups column correctly — Separate multiple groups with commas (ex: Day Shift, Night Shift, Management)
- Upload from Everyone folder — Multi-group uploads only work from the main Everyone contacts view
- Name your column "Groups" — The system won't auto-detect this column, so it must be labeled "Groups"
Upload steps for multiple groups
- Navigate to your Contacts page and confirm you're in the Everyone folder
- Click the Upload a File button
- Upload your file with the properly formatted Groups column
- If groups don't exist, those contacts will be marked as Bad Records. Click View then Bad Records to see excluded contacts
- Click Import to complete the upload
What should my contact file look like?
Use these sample formats as templates for your contact files. The platform accepts various column arrangements and will automatically detect most standard contact information.
Basic contact upload format

Note: Valid 10-digit phone numbers can be formatted as XXX-XXX-XXXX, XXX.XXX.XXXX, XXXXXXXXXX, or (XXX) XXX-XXXX
Multi-group upload format

How do I fix file upload problems?
Most upload issues stem from file format problems, missing phone numbers, or column detection errors. Follow these troubleshooting steps to resolve common problems.
Troubleshooting steps
- Verify phone numbers — Ensure at least one valid 10-digit phone number exists per contact
- Close the file — Make sure your file isn't open in Excel or other programs
- Check column mapping — Click Modify during upload to adjust how columns are detected
- Review bad records — Click View then Bad Records to see which contacts were excluded and why
- Check for duplicates — Click View then Duplicate Records to see repeated contacts
Column limitations
The system only imports these specific column types:
- First Name
- Last Name
- Phone 1, Phone 2, Phone 3
- Notes
- Groups
Additional columns will be ignored during standard contact uploads. However, when uploading during broadcast creation, extra columns can be used for message personalization.
What happens after I upload my file?
After clicking Import, your contacts are added to your account and available immediately for messaging. The system provides a summary of successful imports, bad records, and duplicates found during the process.
Successfully imported contacts will appear in your selected group (or Everyone folder for multi-group uploads). You can then create broadcasts, send individual messages, or organize them into additional groups as needed.